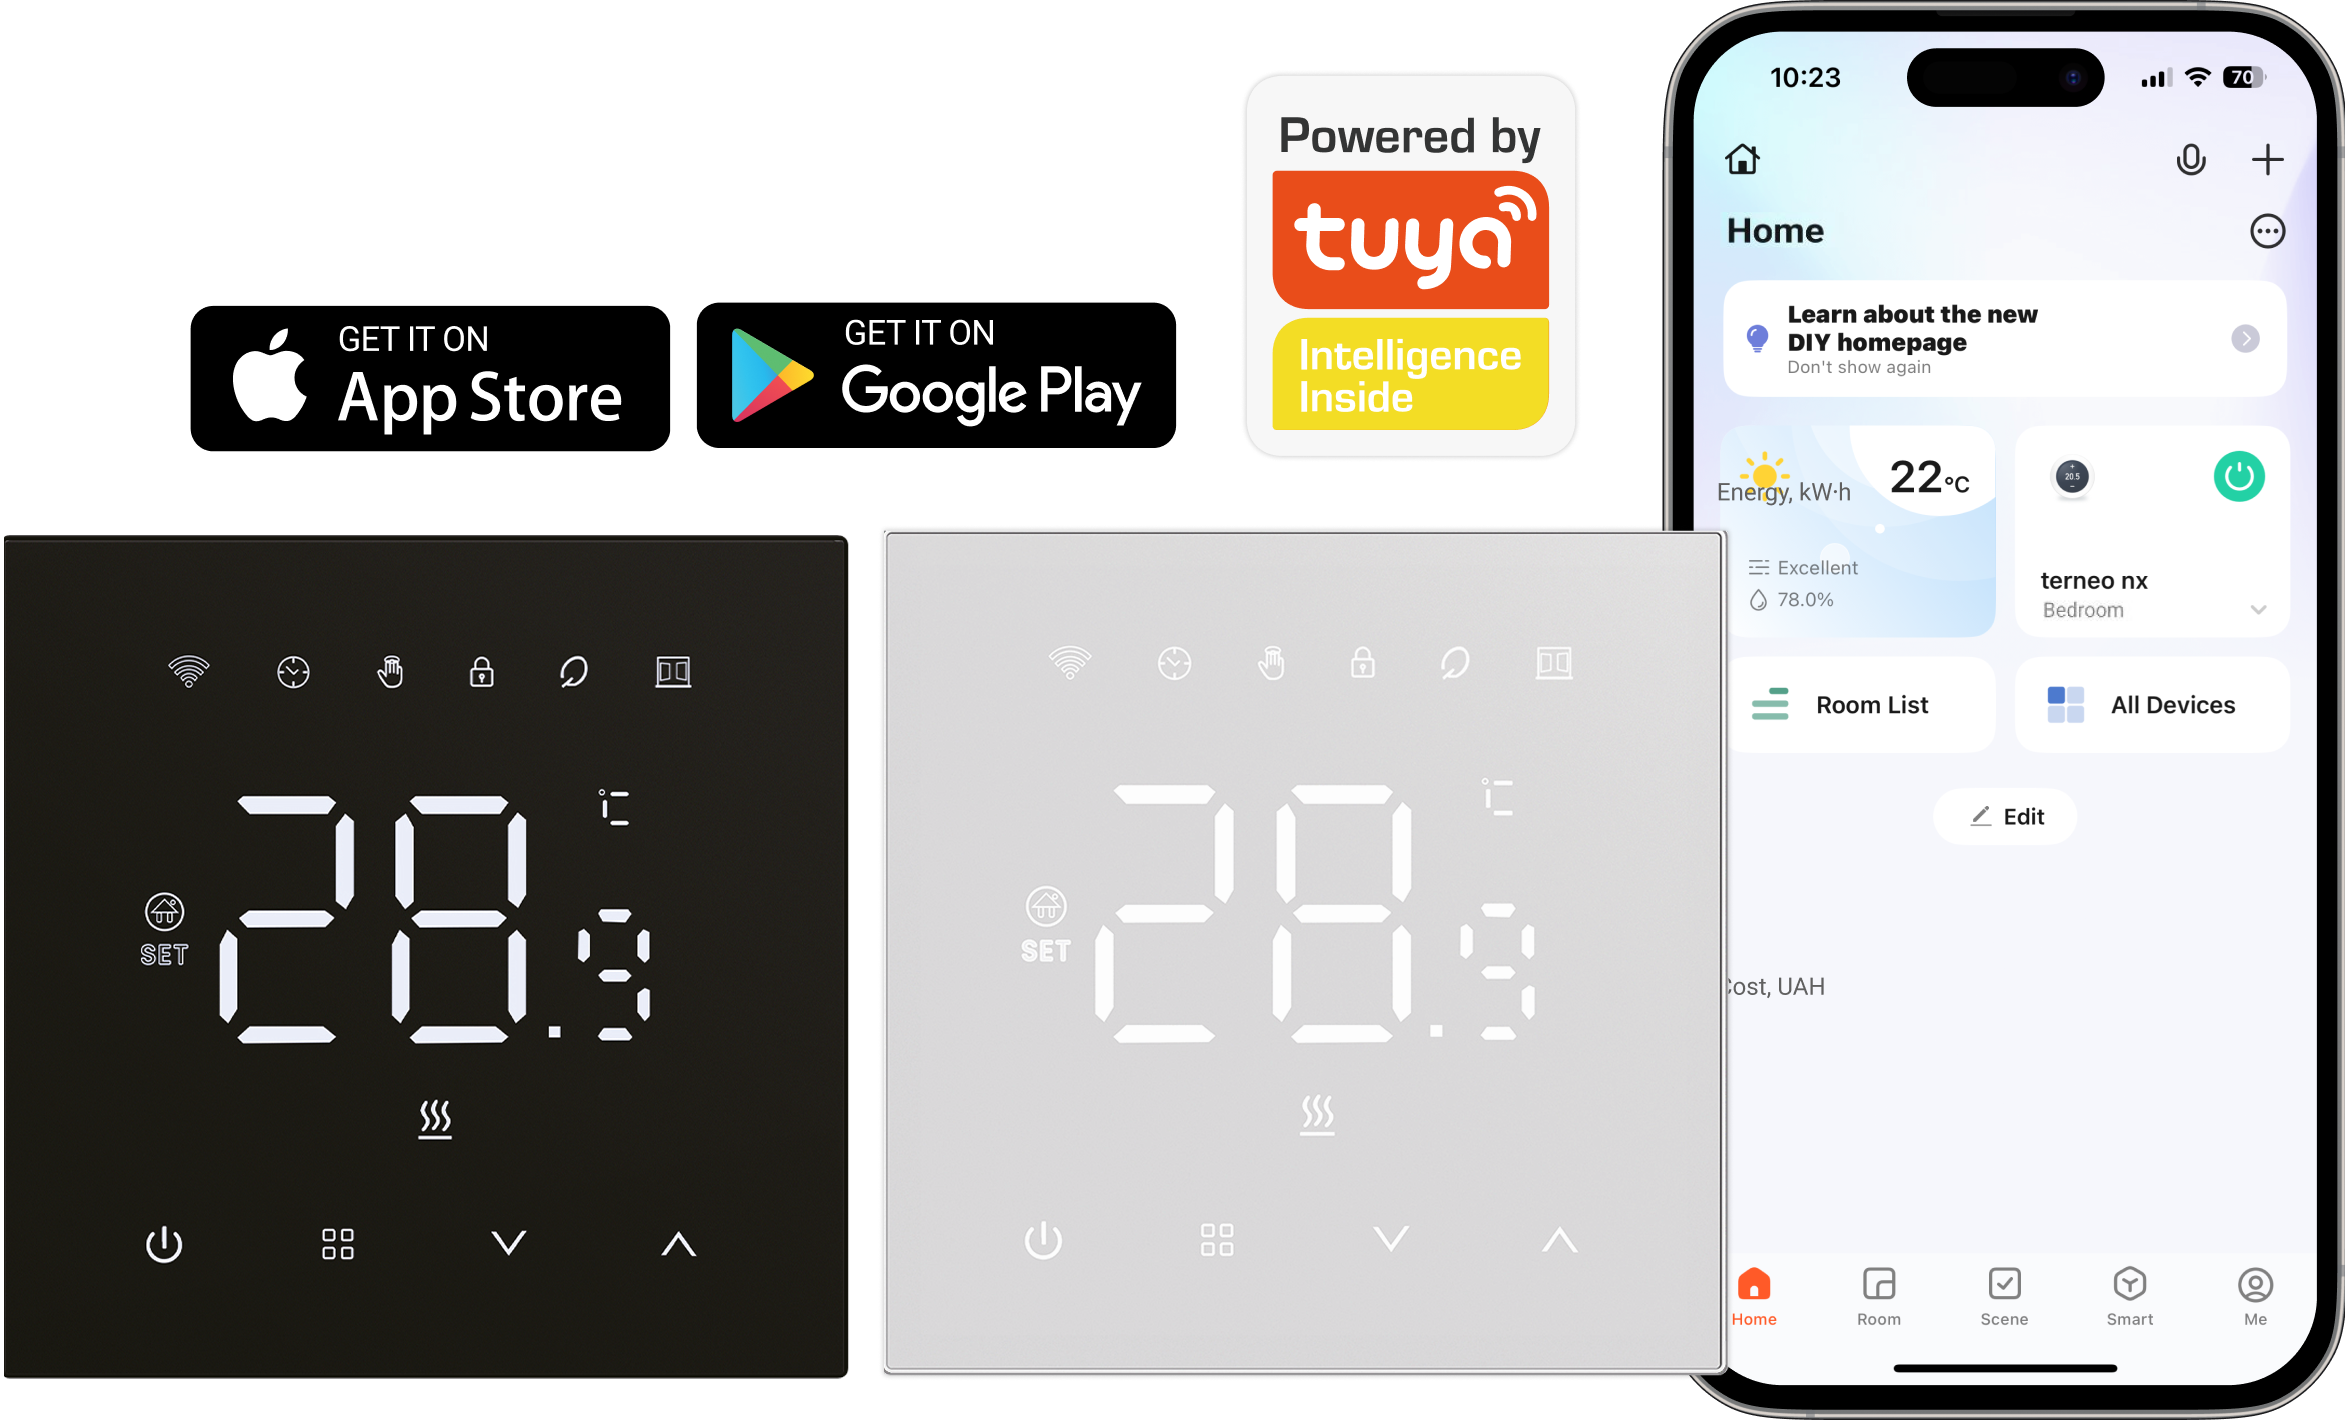
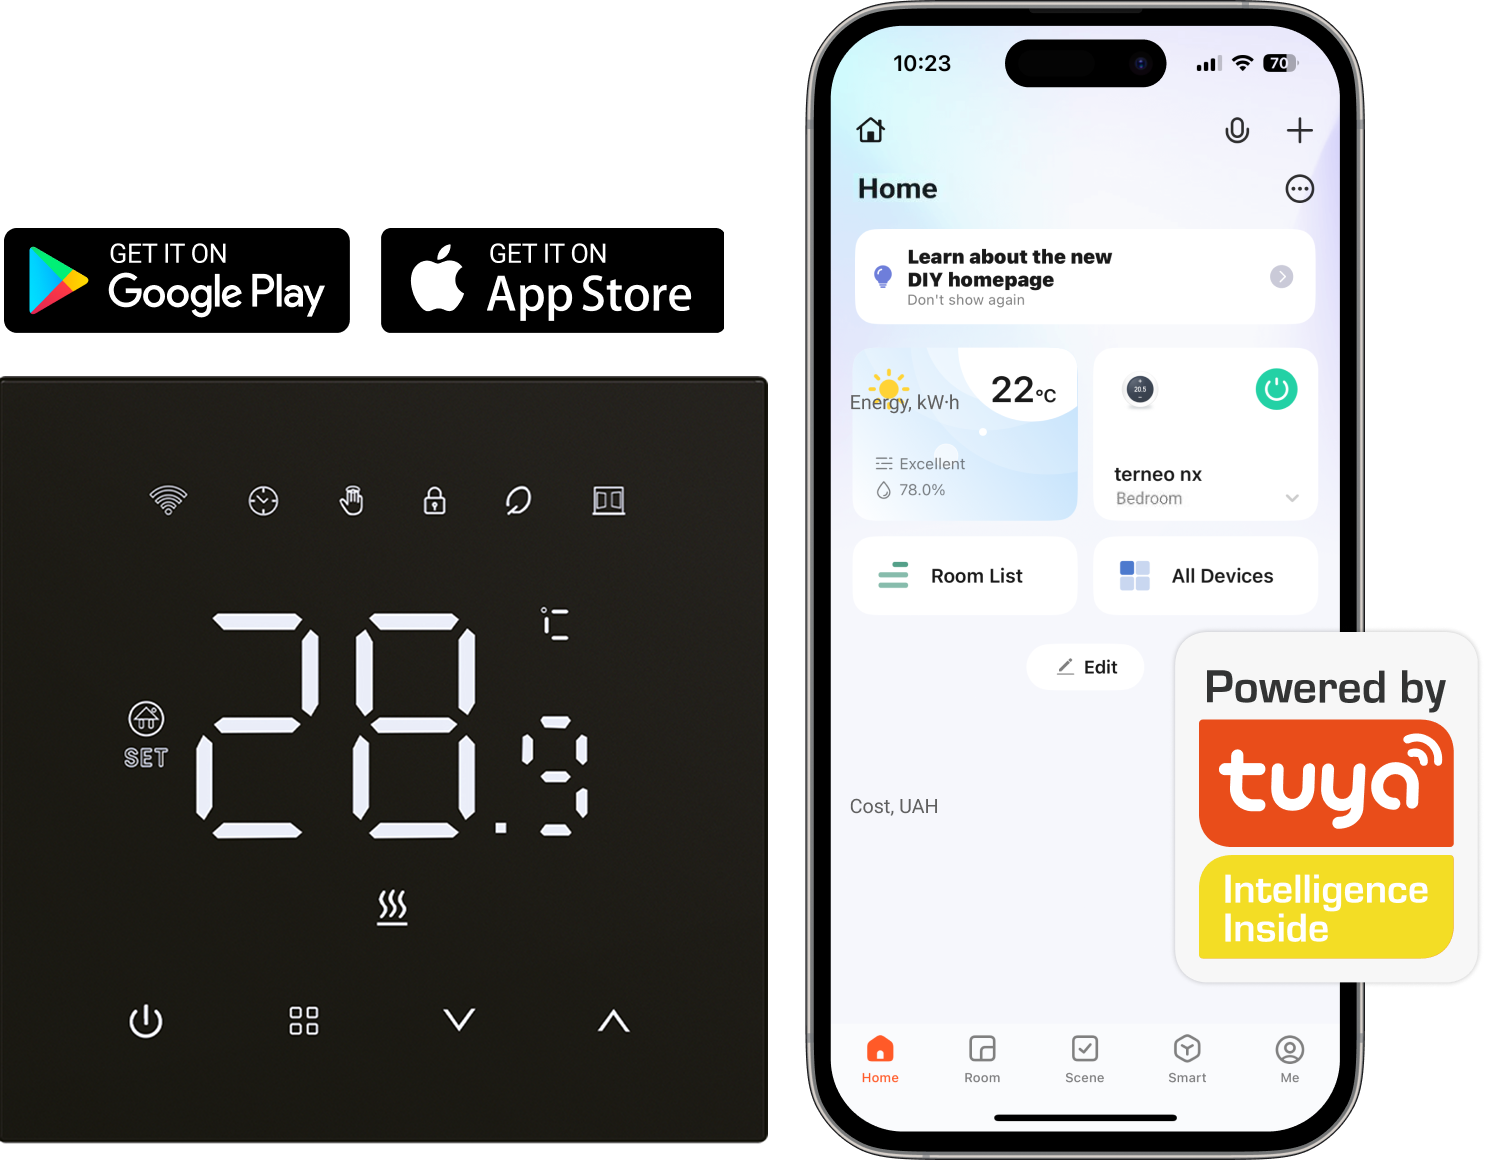
Wi-Fi thermostats terneo nx is designed to maintain a comfortable temperature in rooms heated with an electric cable.
Set your own schedule by selecting comfort and energy-saving periods. In the morning and evening, terneo maintains the preferred temperature, while lowering it during the day and night to save electricity. This ensures your home remains comfortable and reduces your energy bills. Moreover, it has manual and automatic functions, programmable functions, and state memory functions. Download Tuya Smart App
One of the key advantages of the Tuya app is the ability to create convenient automation scenarios that control your devices automatically. Thermostats can operate on a schedule or respond to events such as time, weather, or your location. Tuya can be controlled from Apple Watch, Android smartwatches, and even through CarPlay and Android Auto. Voice control is also available via Amazon Alexa and Google Assistant.
Geofencing — automatic heat control You don’t overpay for heating when no one is at home. The thermostat tracks your smartphone’s location and automatically turns the heating on or lowers the temperature.
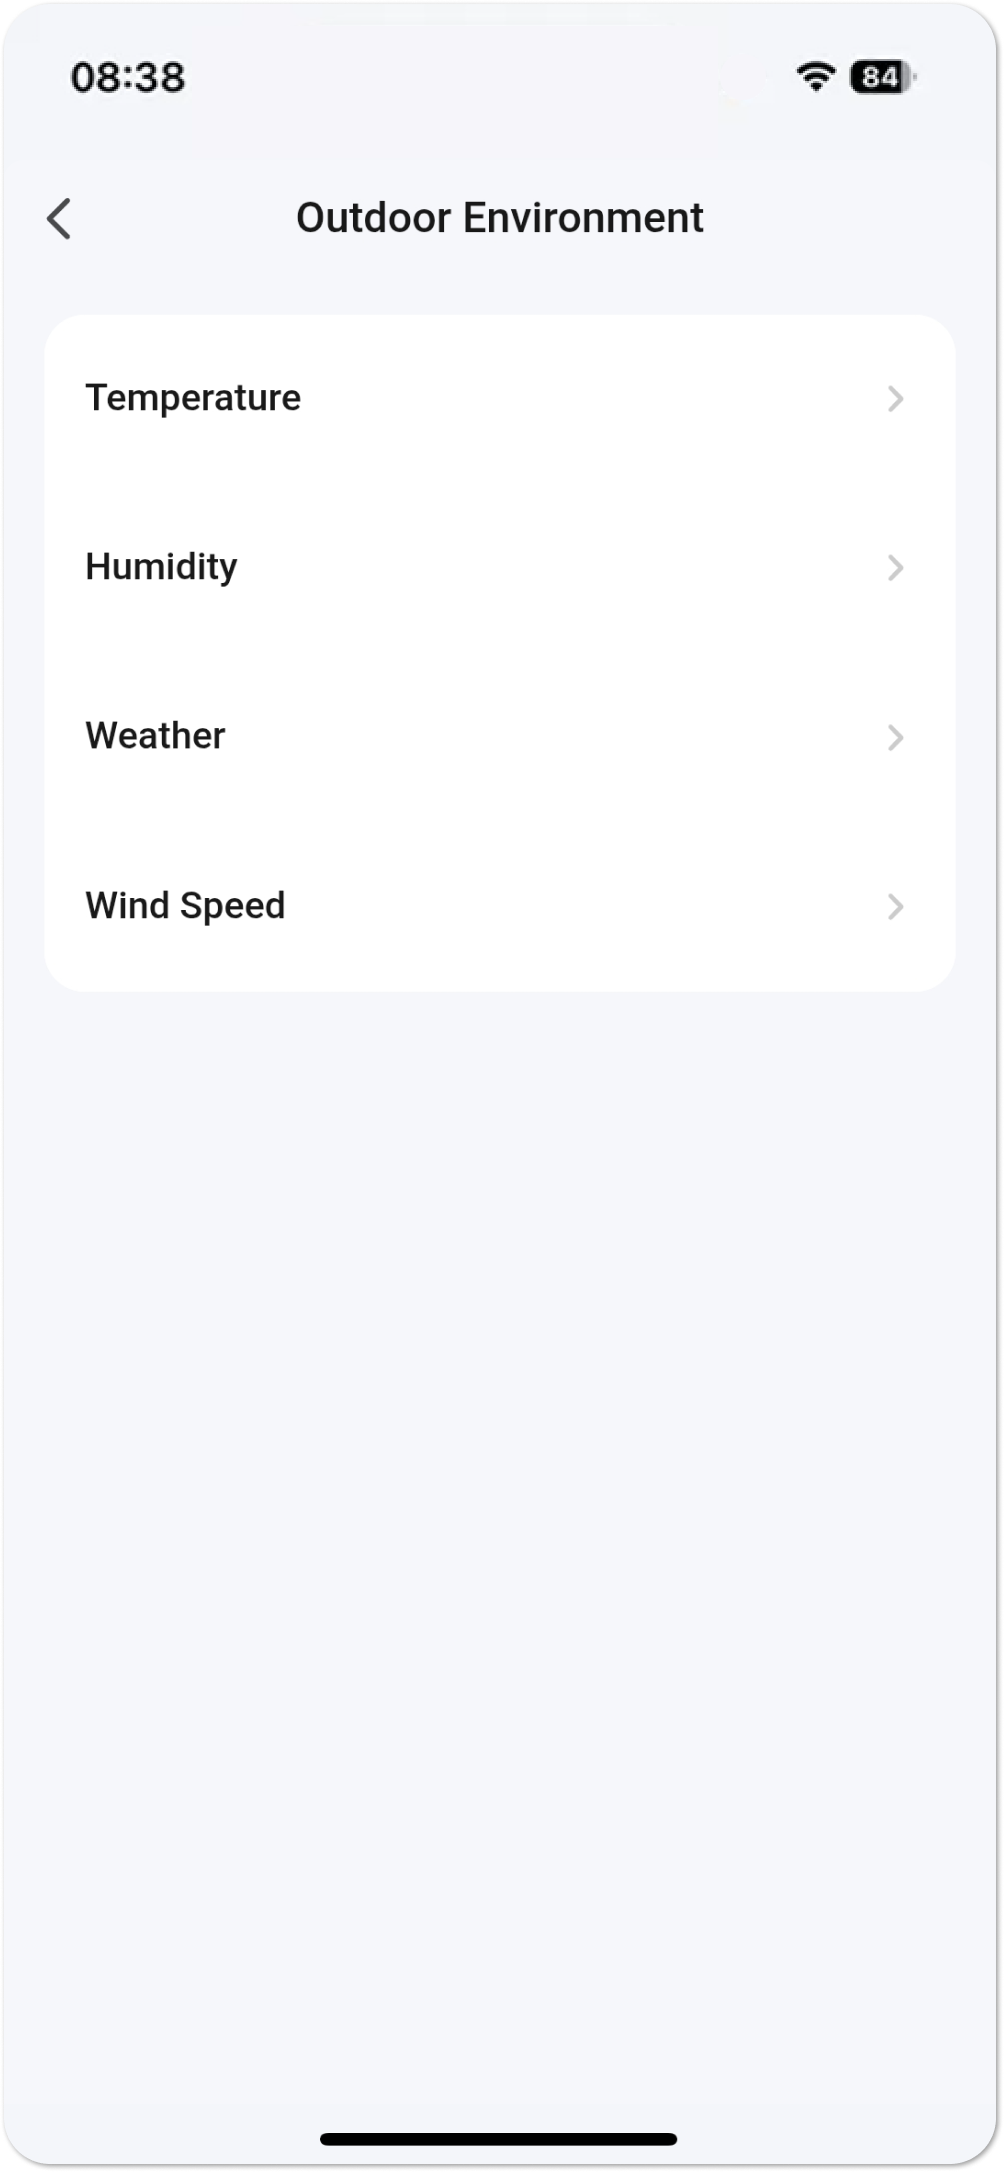
Weather-based control — warmth that thinks for you This feature automatically adjusts the thermostat operation according to the outdoor temperature. If it gets colder outside, the system increases heating; when it gets warmer, it saves energy without your intervention.
Weekly schedule — comfort by schedule, savings without effort Set automatic temperature control for the week so the thermostat switches to an energy-saving mode while you are at work and to a comfort mode on weekends.
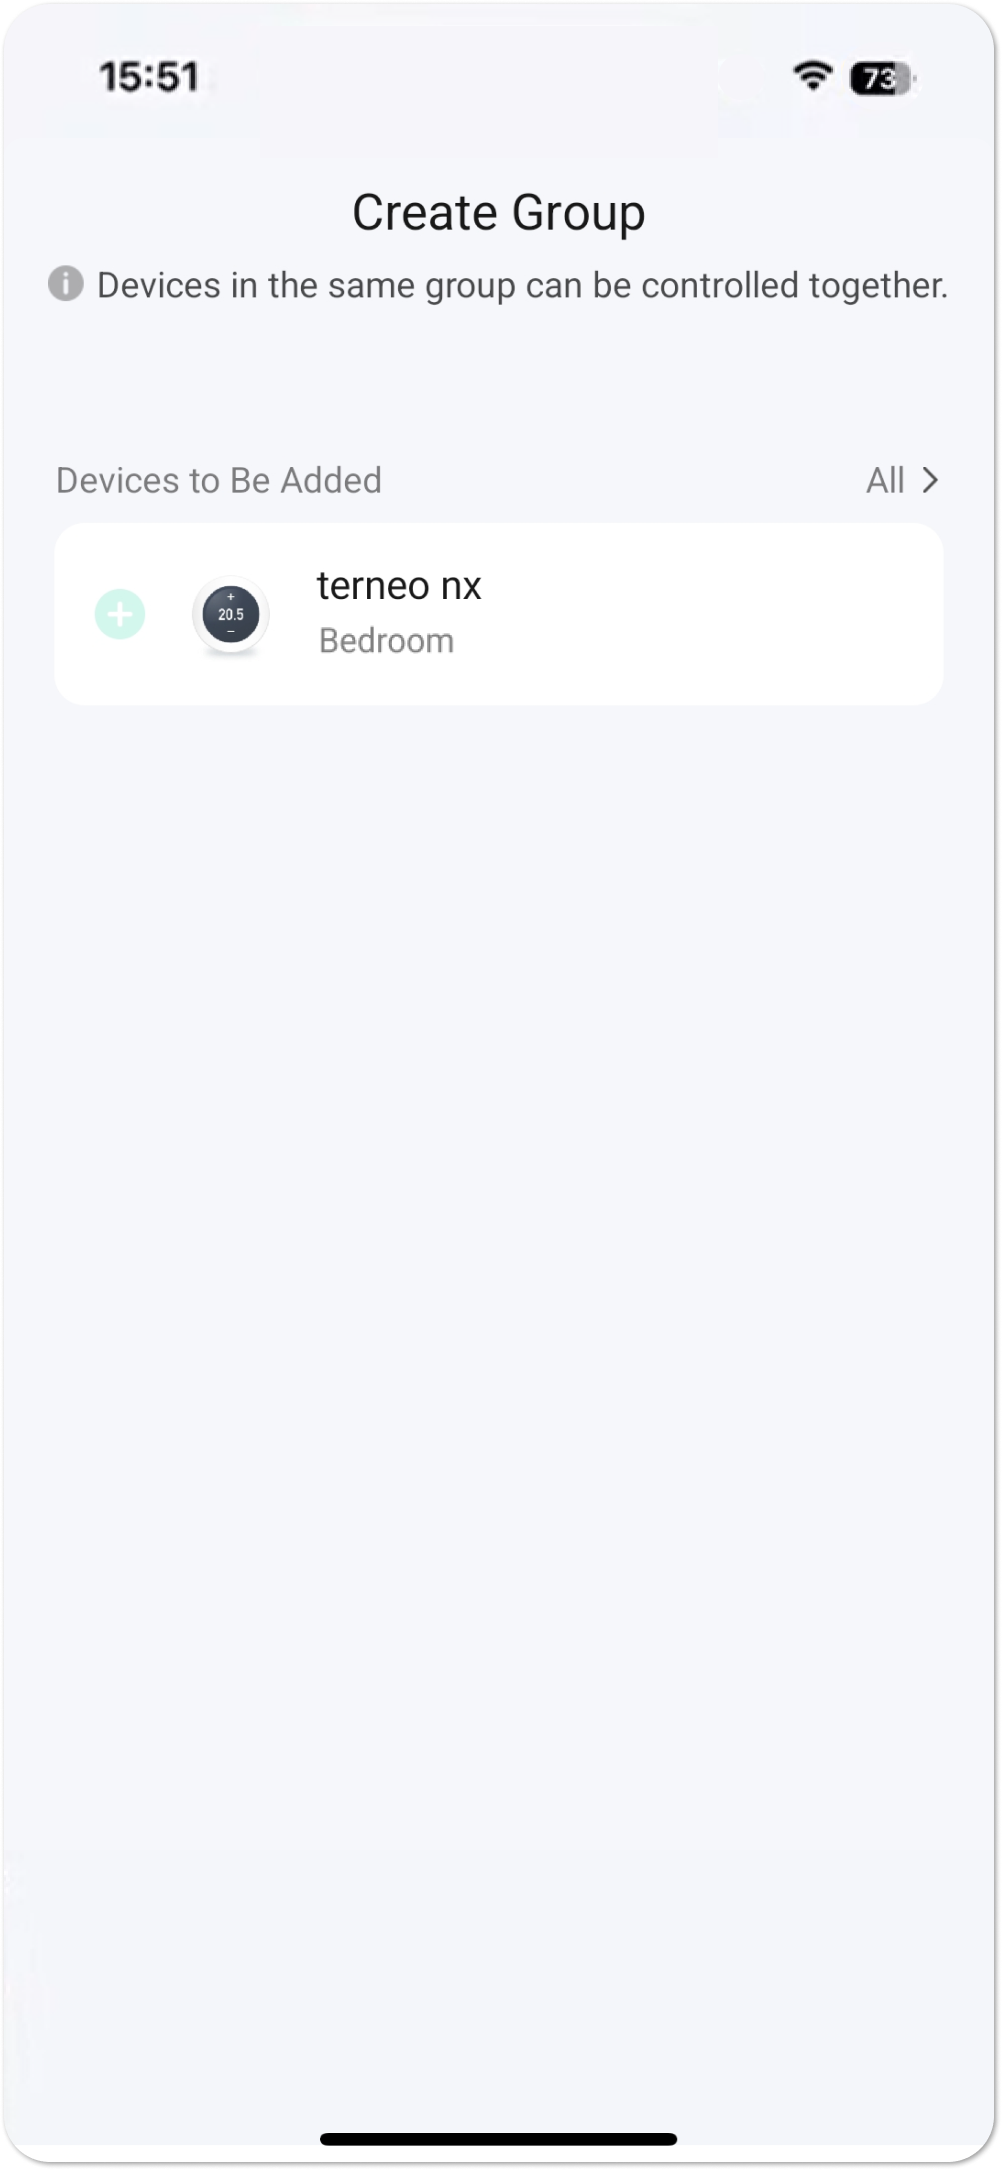
Group control — easier than managing each device separately If you have several thermostats, control them as one. Create a group in the device settings ("Create group") and turn heating on or off throughout the entire home with a single tap.
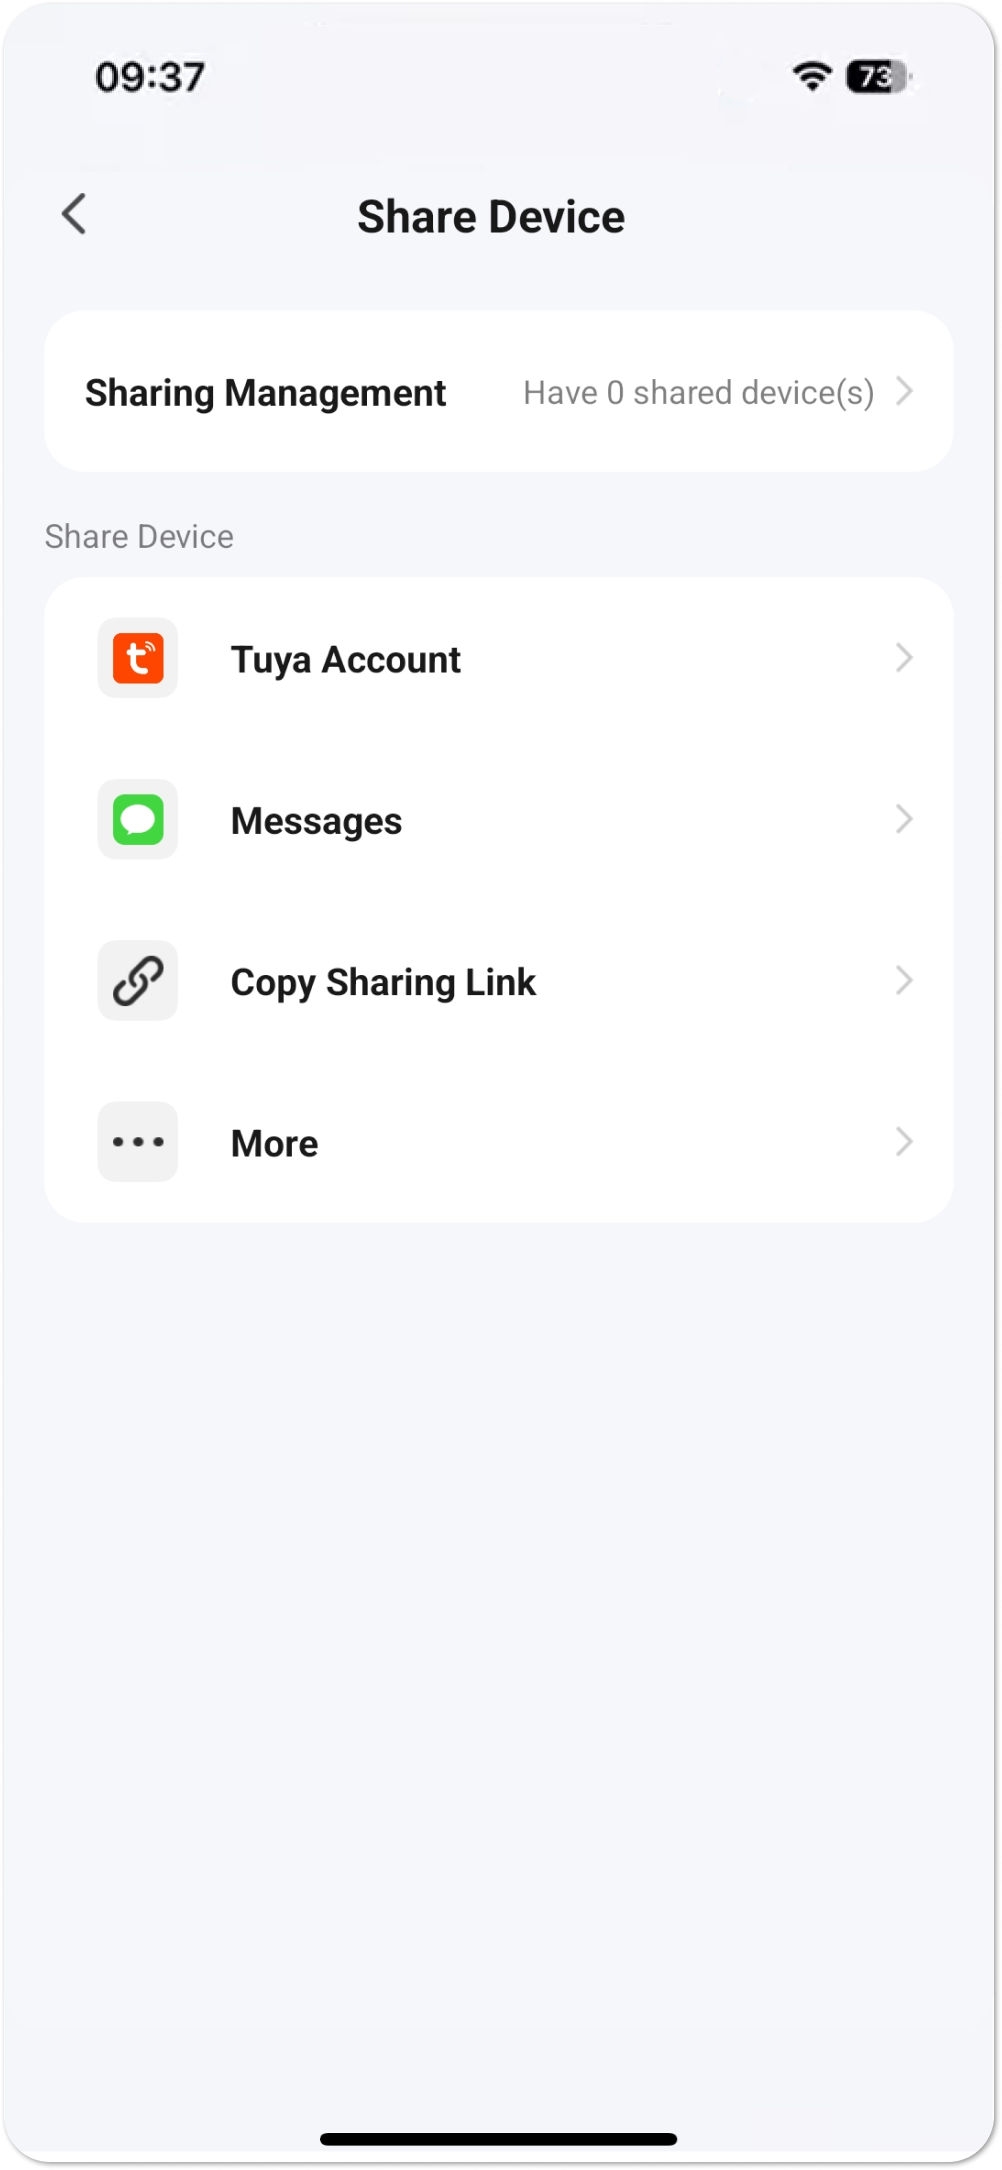
Tuya sharing — manage together conveniently Grant other users access to your devices — for viewing, control, or full management. You can define different access levels, from administrator rights to basic user access.
Technical data
Technical data
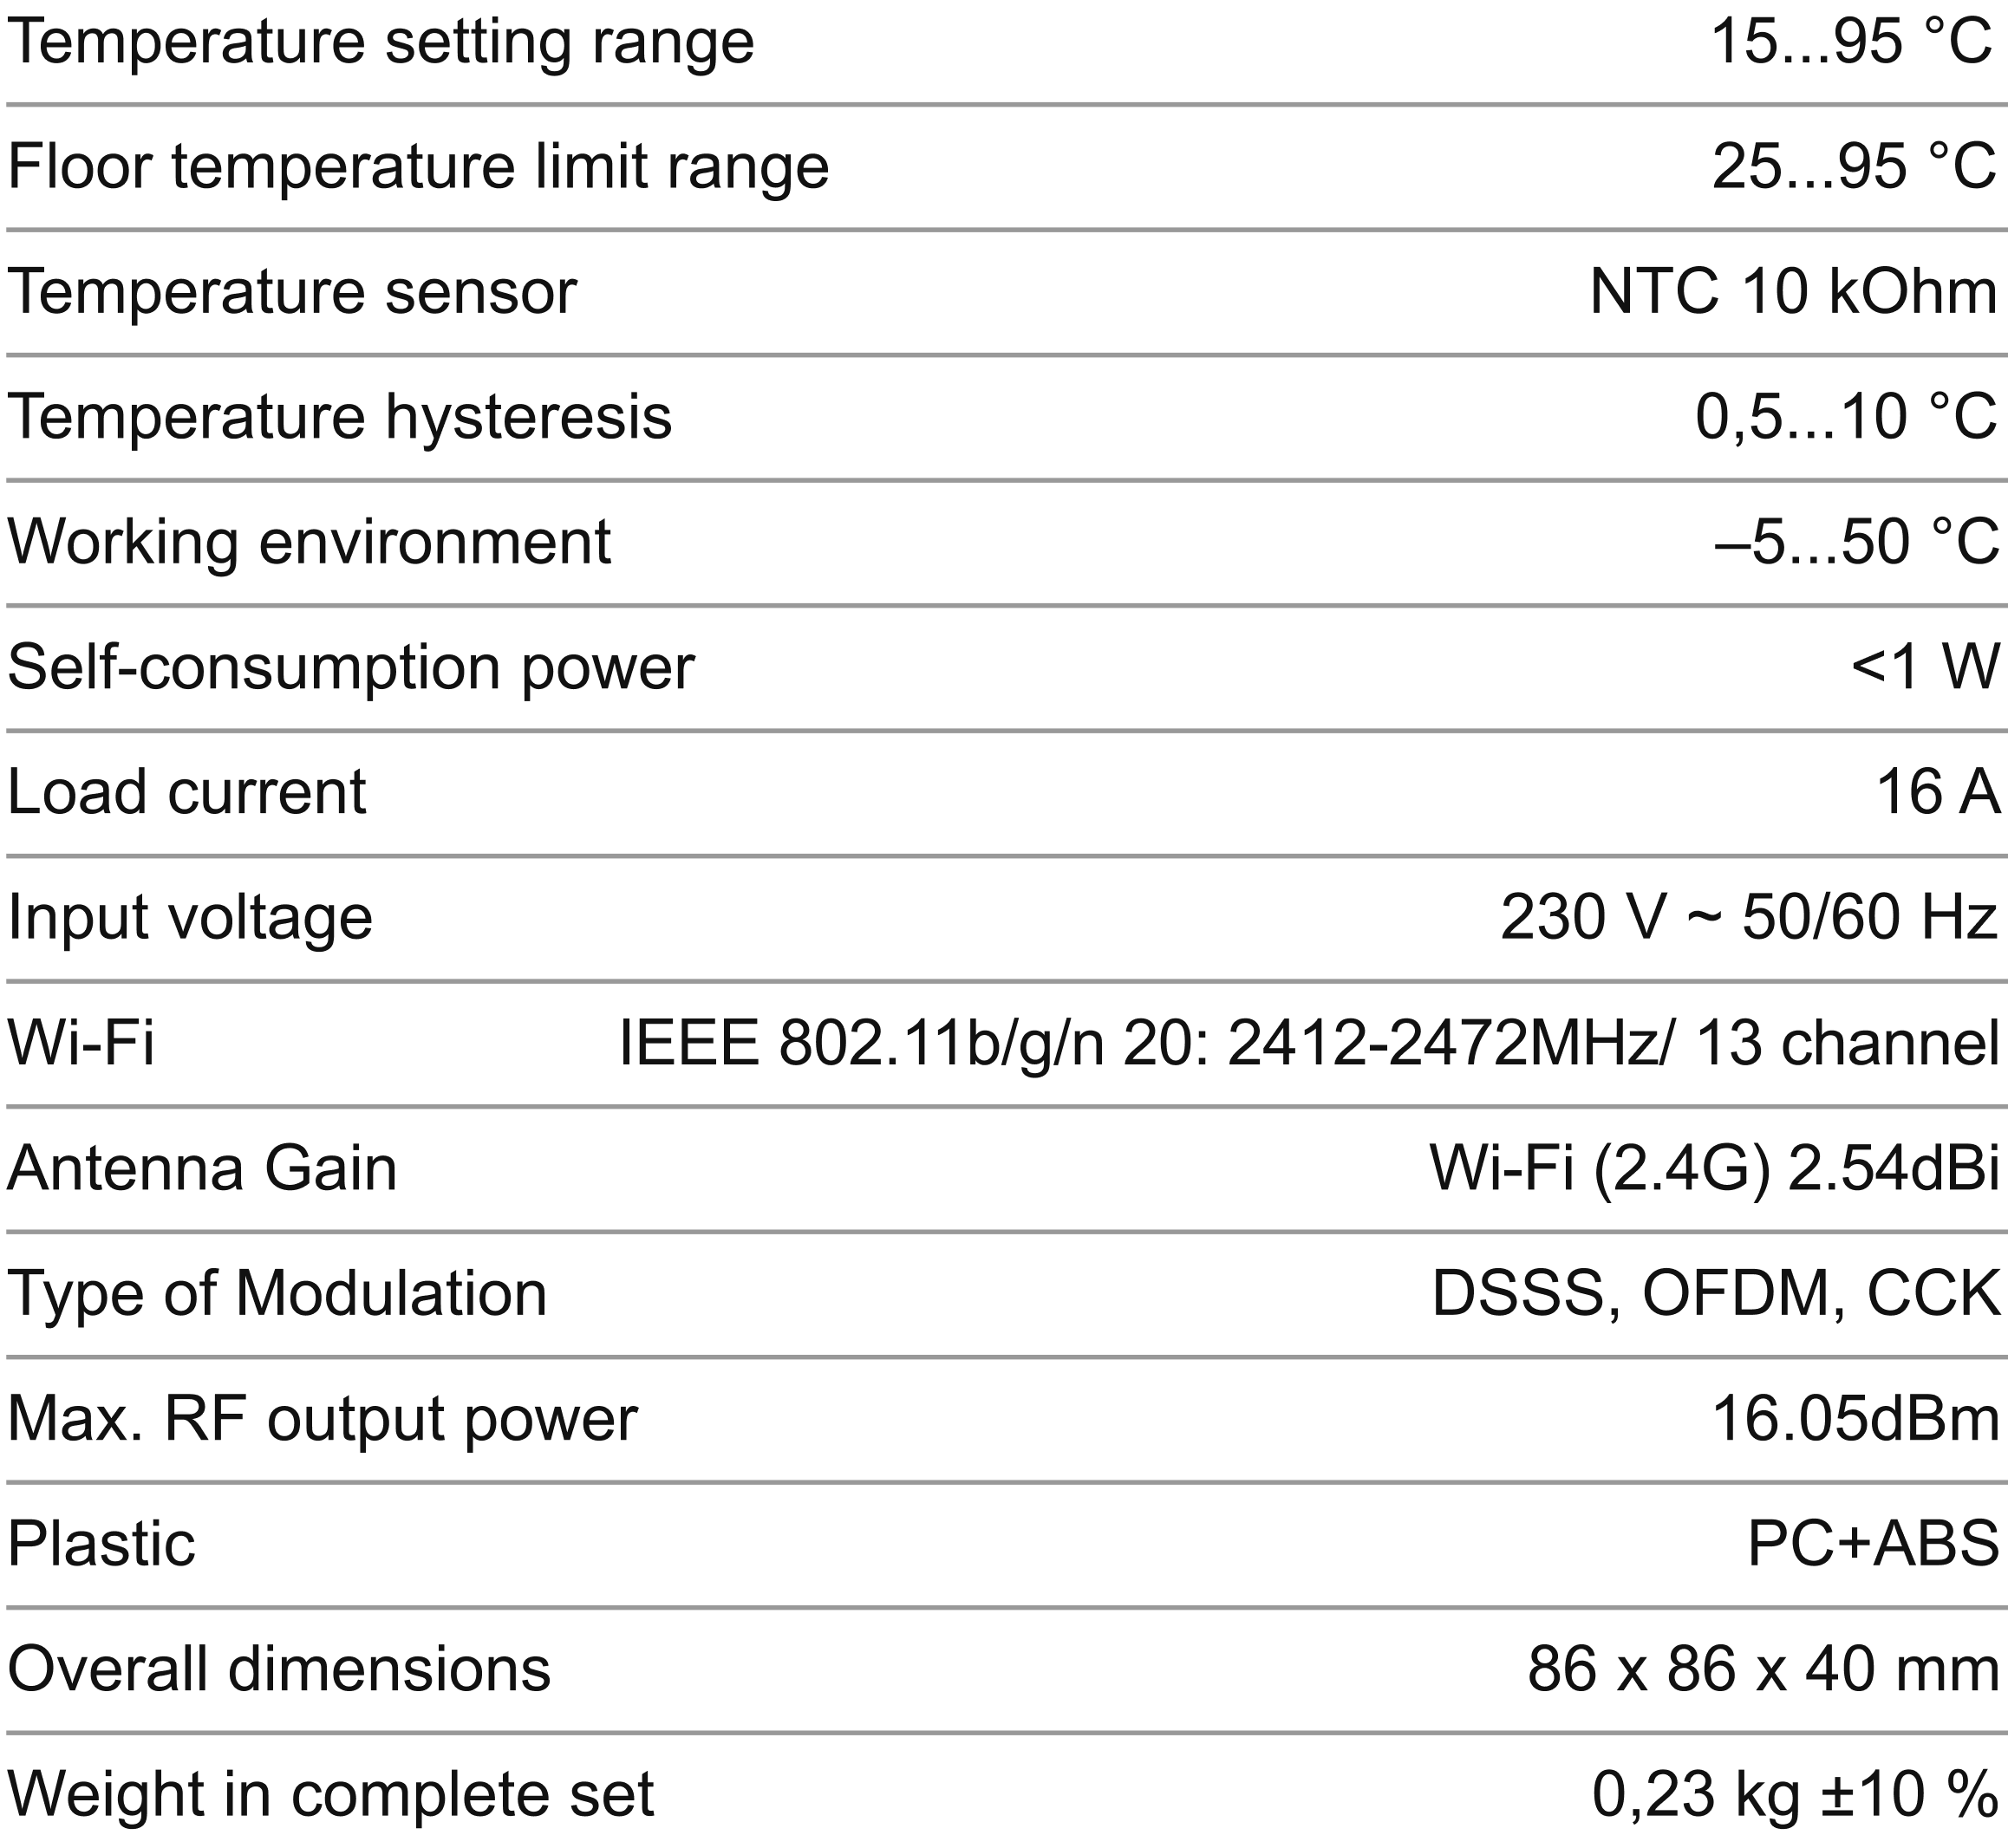
Temperature setting range
15...95 °C
Floor temperature limit range
25...95 °C
Temperature sensor
NTC 10 kOhm
Temperature hysteresis
0,5...10 °C
Working environment
–5...50 °C
Self-consumption power
<1 W
Load current
16 A
Input voltage
230 V ~ 50/60 Hz
Wi-Fi
IEEE 802.11b/g/n 20: 2412-2472MHz/ 13 channel
Antenna Gain
Wi-Fi (2.4G) 2.54dBi
Type of Modulation
DSSS, OFDM, CCK
Max. RF output power
16.05dBm
Plastic
PC+ABS
Overall dimensions (w x h x d)
103 х 96 х 66 mm
Weight in the complete set
0,23 kg ±10 %
Installation
Installation
Read this document carefully before installing and using the thermostat. This will help to avoid possible hazards, errors, and misunderstandings.
The ambient temperature during installation should be within –5...+45 °C. When installing in a bathroom, toilet, kitchen, or pool, place the thermostat in a location not exposed to accidental splashes. Minimize the risk of moisture and liquids entering the installation area.
☝️Recommendations for connecting loads more then 10 A. The terneo thermostat may not handle a current of 16 A and could overheat in the presence of unfavorable factors such as poor heat dissipation from the socket, high ambient temperature, or poor installation quality. We guarantee stable operation of the thermostat with a current up to 10 A. If the current exceeds 10 A, we recommend connecting the heating cable through a contactor (magnetic starter) rated for the required current. To protect against short circuits, install an automatic circuit breaker (CB) with a rating of up to 16 A in the phase wire break before the thermostat.
The terminals of the thermostat are designed for wires with a cross-section of no more than 2.5 mm². It is recommended to use soft copper wire, which can be tightened in the terminals using a screw-driver with a blade width not exceeding 3 mm and a torque of 0.5 N·m. The use of aluminum is not desirable. A screwdriver with a blade width greater than 3 mm may cause mechanical damage to the terminals, which can result in the loss of warranty service rights.
For installation you need:
— Make a hole in the wall with a diameter of 60 mm and 45 mm deep for the mounting box and channels for power supply and sensor wires.
— Bring the heating system power and sensor wires to the mounting box.
1. Connect the thermostat according to the connection diagram
2. Disconnect the control panel from the baseby pressing the two bottom clips with a screwdriver
3. Secure the thermostat in the mounting box using screws
4. Аttach the upper part of the panel to the base and secure until it clicks into place
Electrical connection diagram
Electrical connection diagram
The supply voltage (AC 100–240 V, 50 Hz) is connected to terminals 1 (L) та 2 (N). The line (L) is connected to terminals 1, the neutral (N) — to terminals 2.
Load (max 16 А) is connected to terminals 3 (N, neutral) and 4 (L, line). The temperature sensor (NTC) is connected to terminals 5 and 6. Wire colors do not matter during connection.
WI-FI connection
WI-FI connection
Before using the thermostat for the first time, you need to set up Wi-Fi and connect via a smartphone or tablet to ensure communication between the devices.
When the thermostat is turned on, press and hold for 5 sec, the WI-FI icon flashes on the thermostat display — the thermostat will enter the settings mode.
To operate the thermostat, make sure to turn on Bluetooth on your smartphone.
Follow 3 steps to connect the thermostat to Wi-Fi:
Follow 3 steps to connect the thermostat to Wi-Fi:
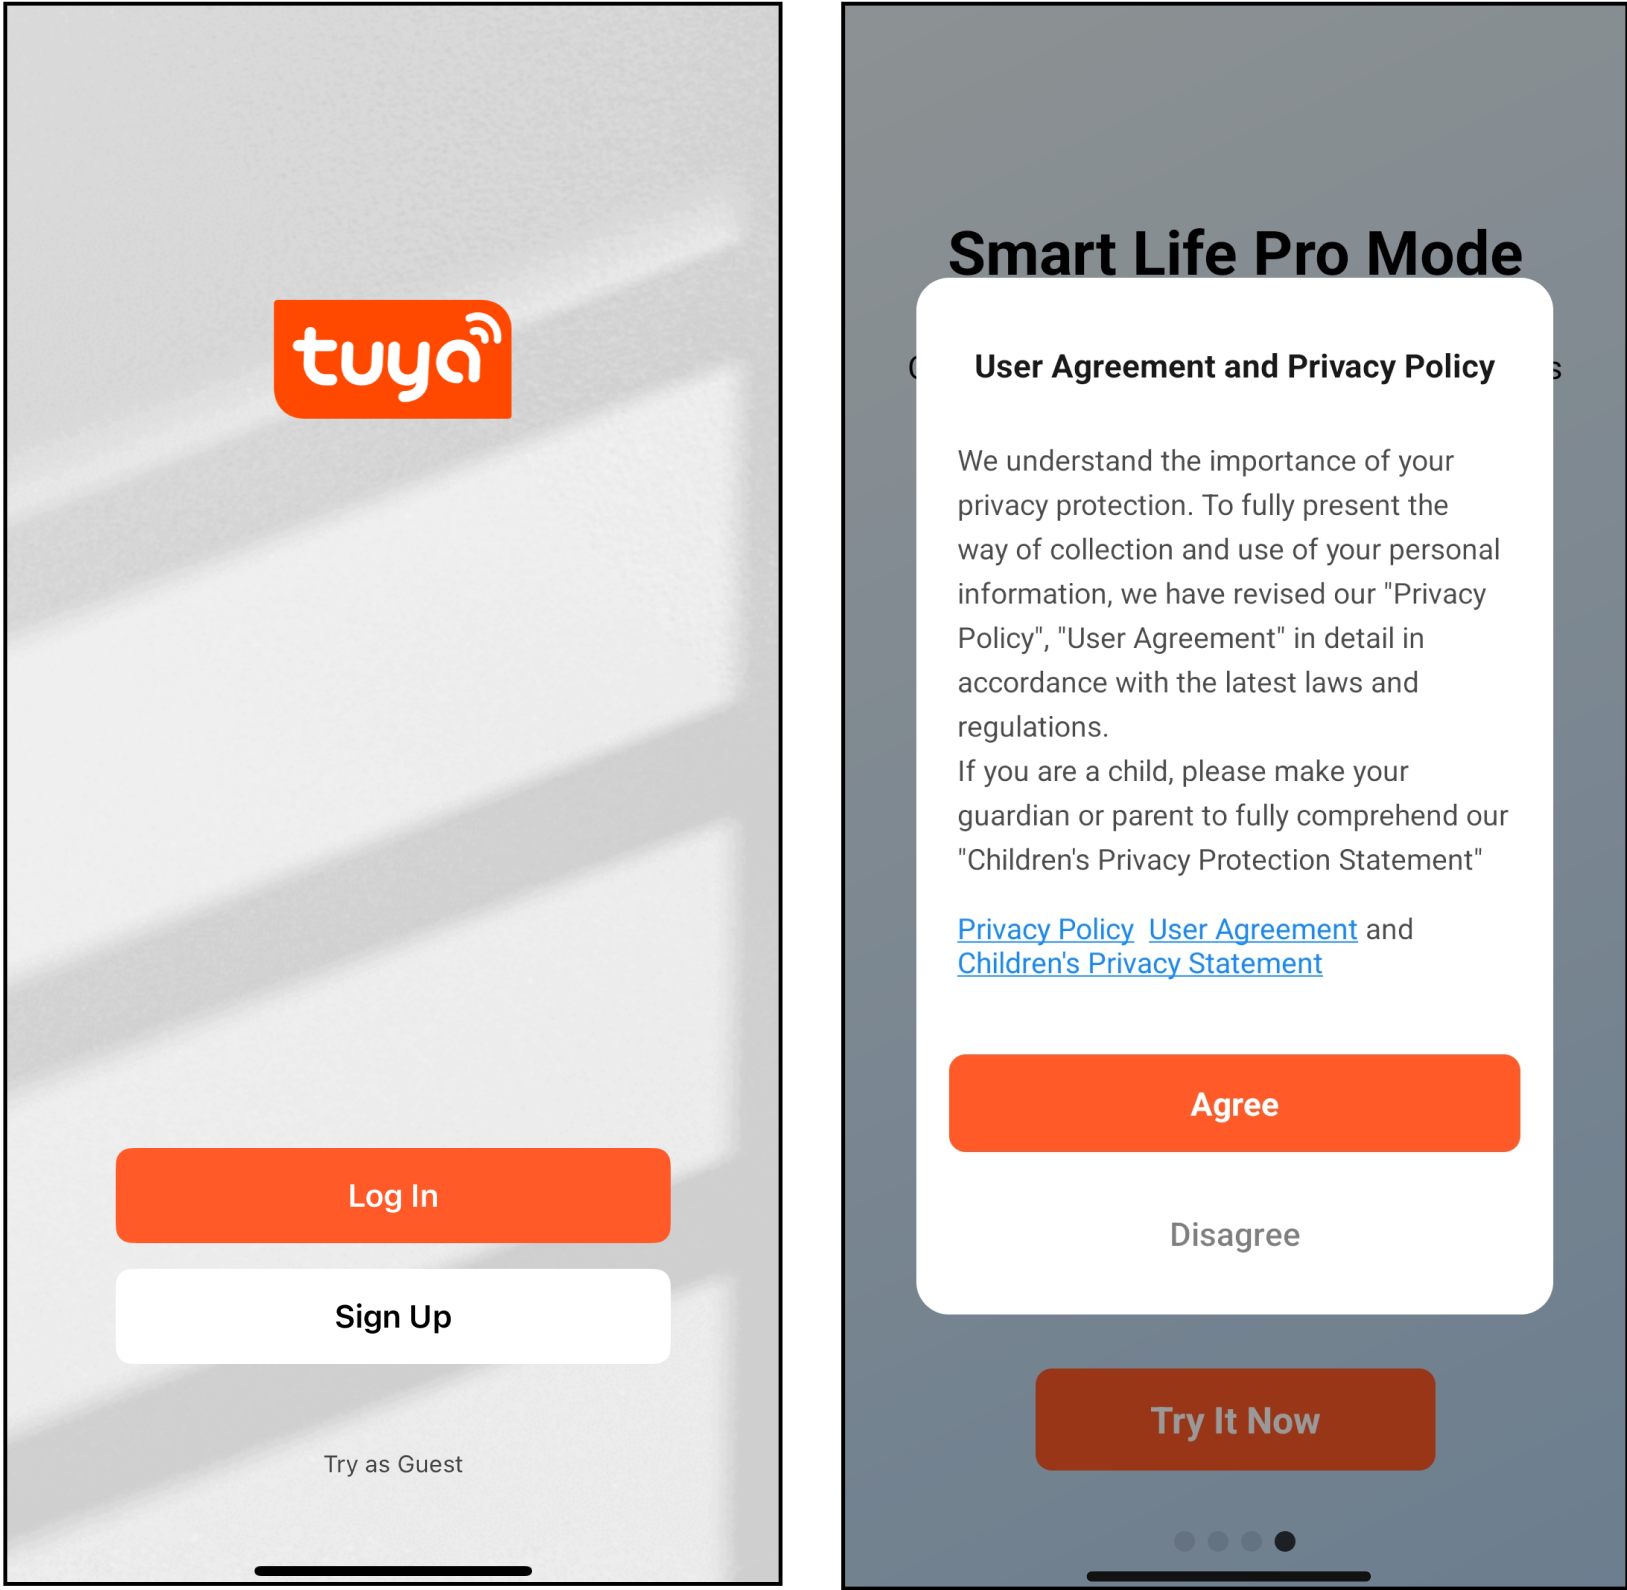
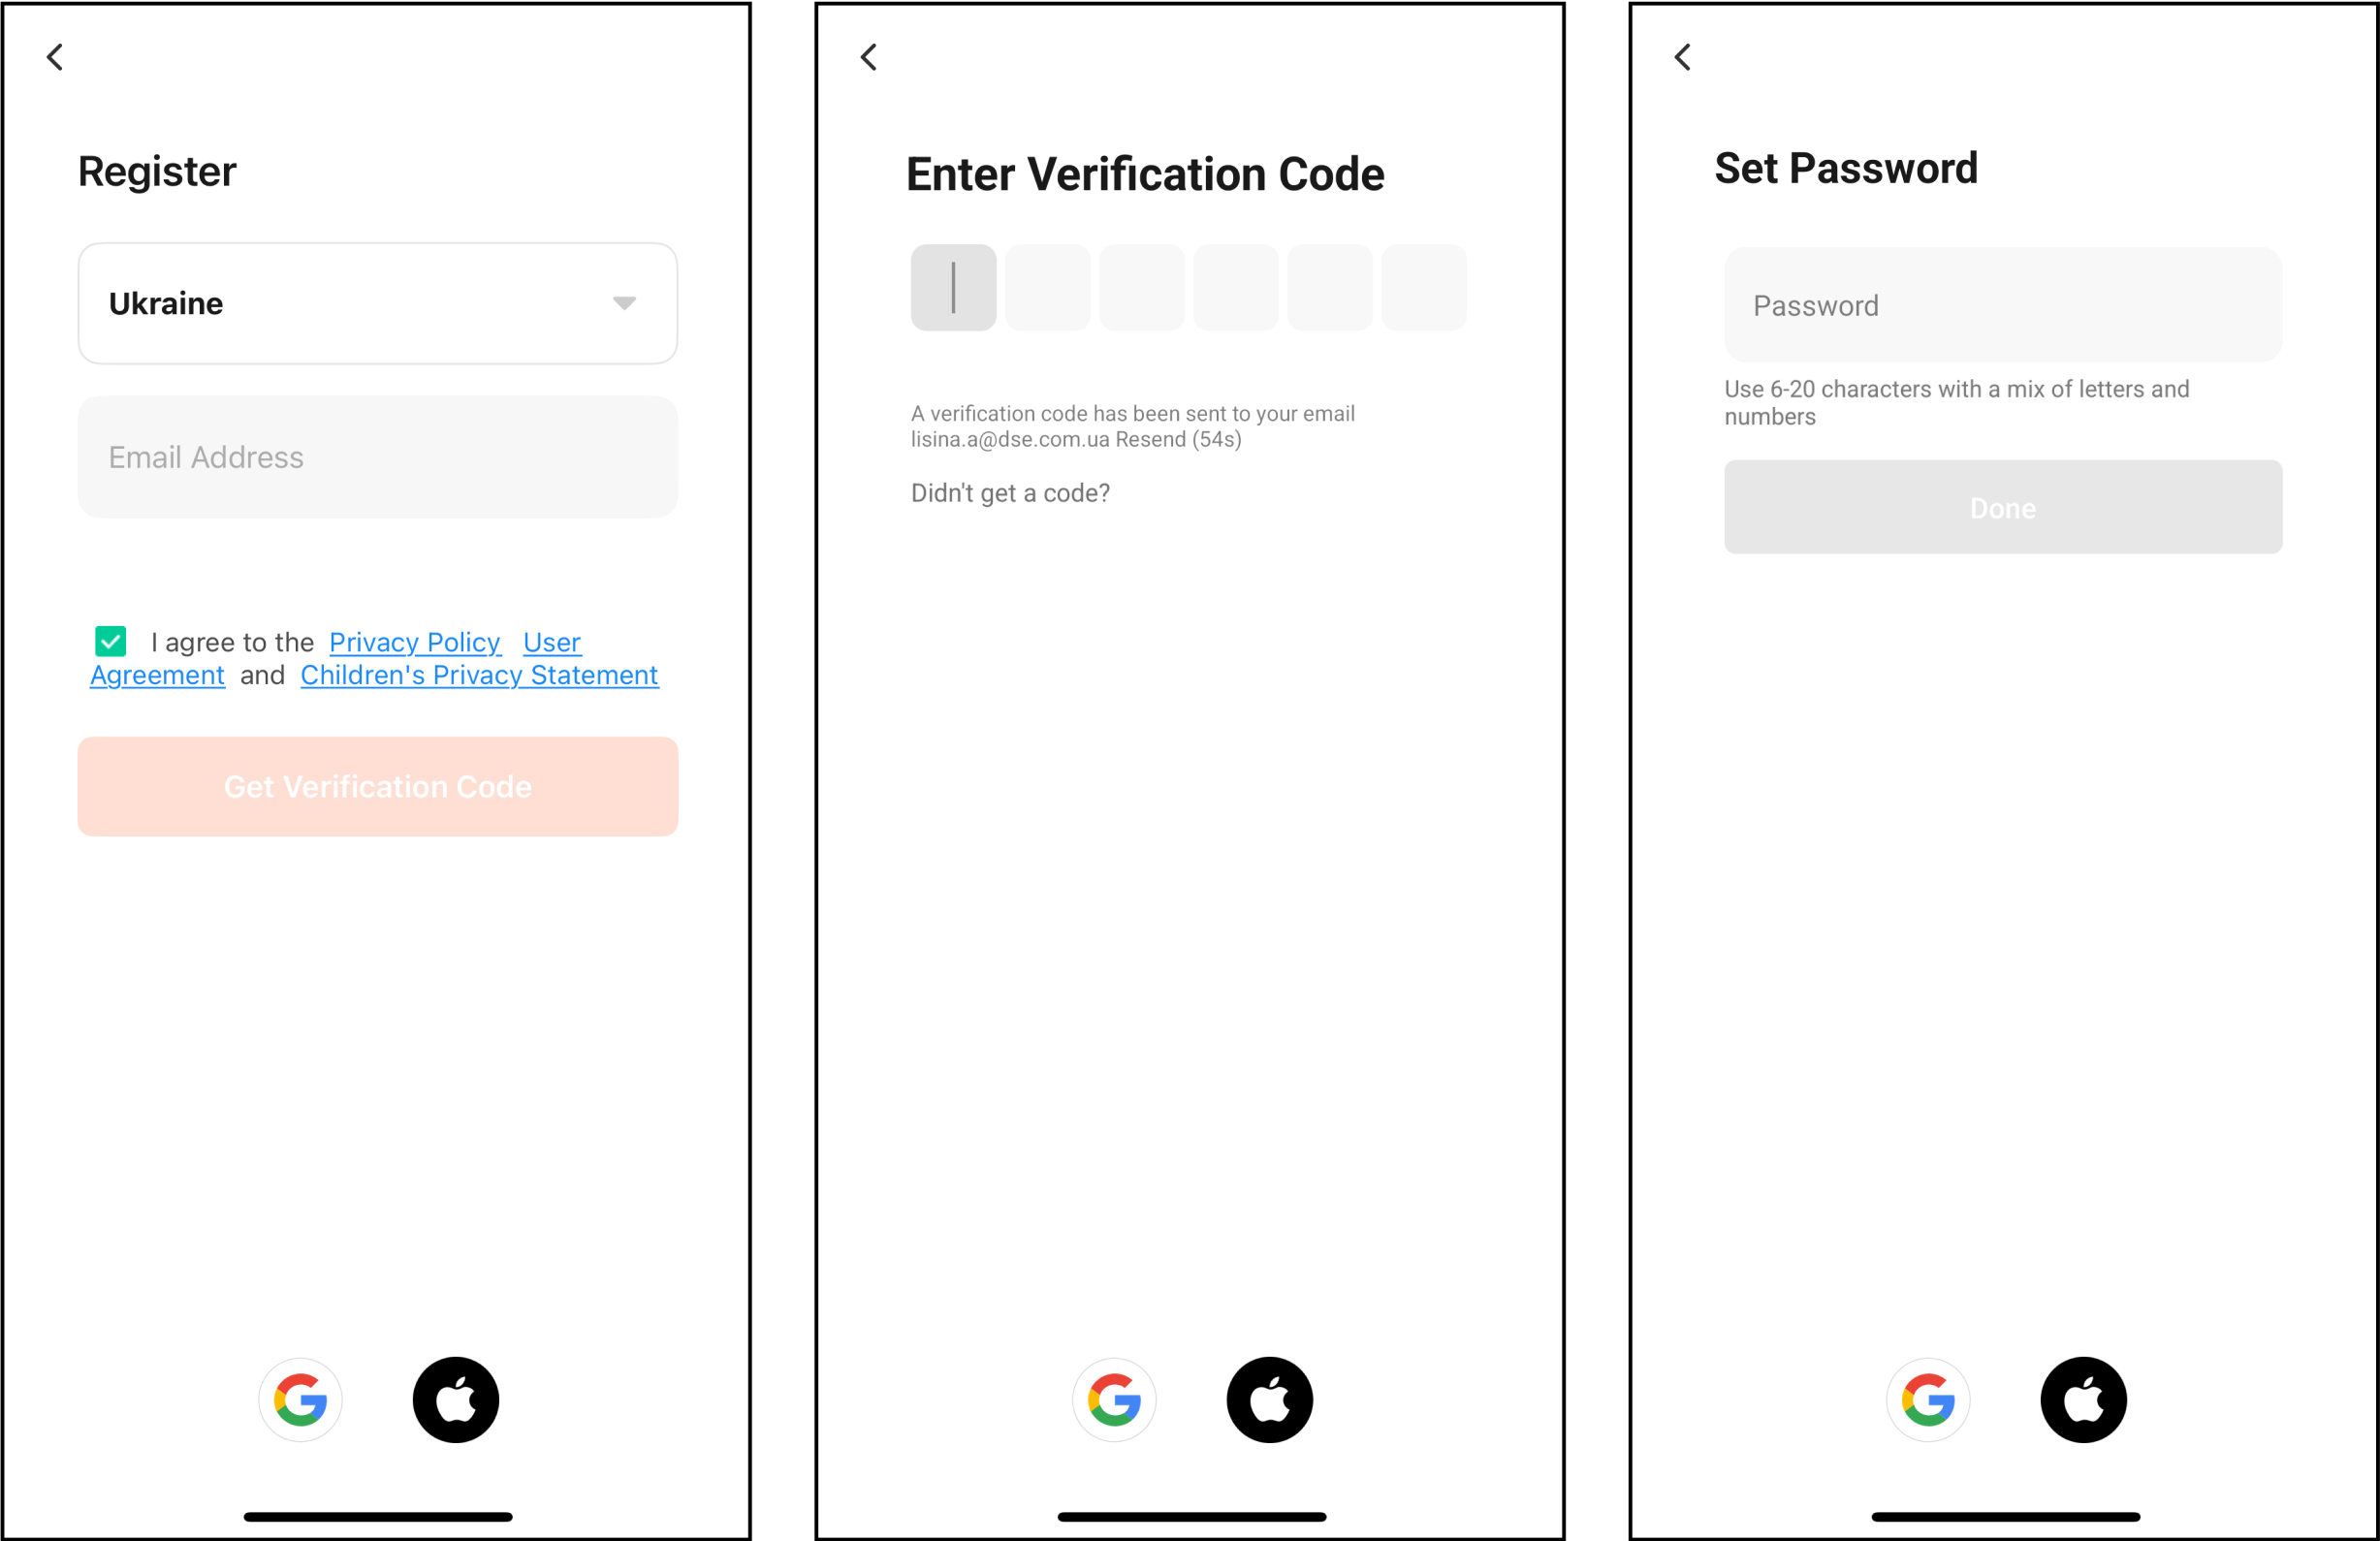
1. Download Tuya Smart App. Open the App Store or Google Play on your smartphone.
2. Register an account, if you do not already have Tuya account. You can choose to register or log in via SMS verification code.
— Tap "Create New Account" to enter the privacy policy page of Tuya Smart Platform.
— After that, enter your phone number.
The system automatically determines the current country/region, or you can manually select the country/region, enter your phone number or email address, and tap "Get the Verification Code". Enter the received verification code. Then enter the password. Tap "Finish" to register successfully.
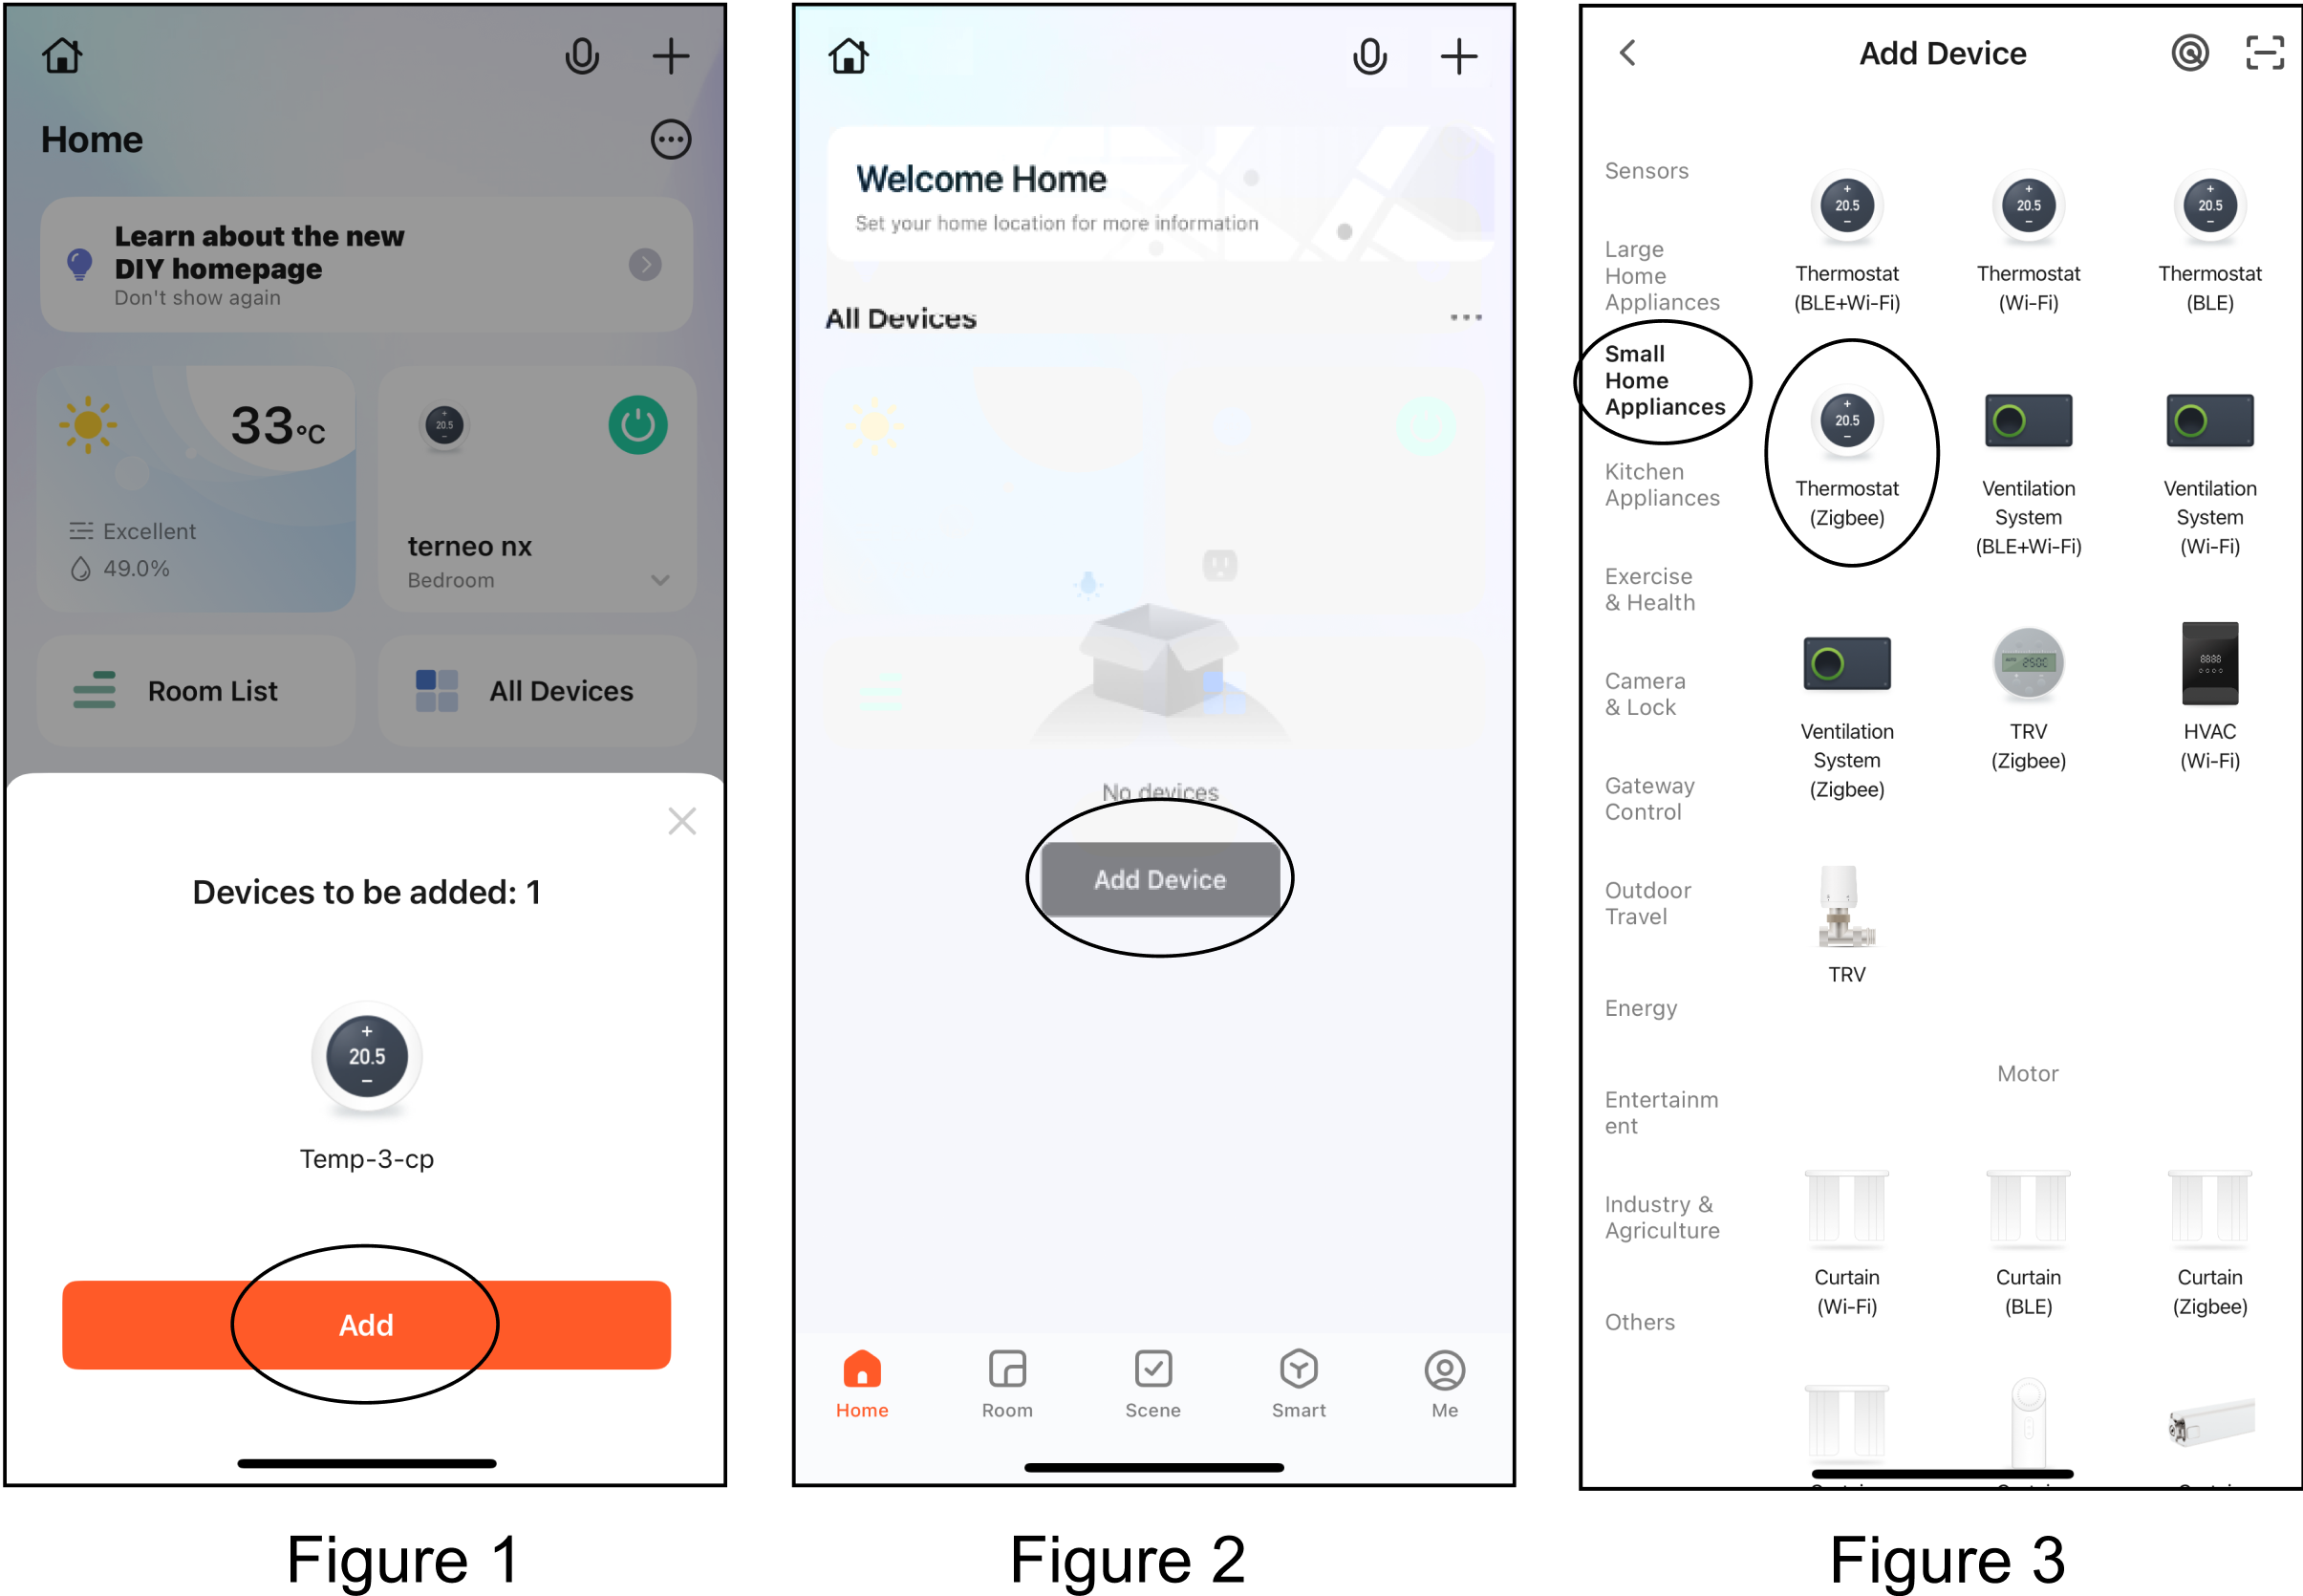
3. Add the device to the Tuya app. Make sure that Bluetooth is turned on on your smartphone and that the thermostat is in pairing mode. If the app has automatically paired with the device, it will immediately offer pairing, as shown in Figure 1. If not, tap "Add Device" or "+" in the upper right corner of the main page of the app (Figure 2). Select the device type and follow the prompts (Figure 3).
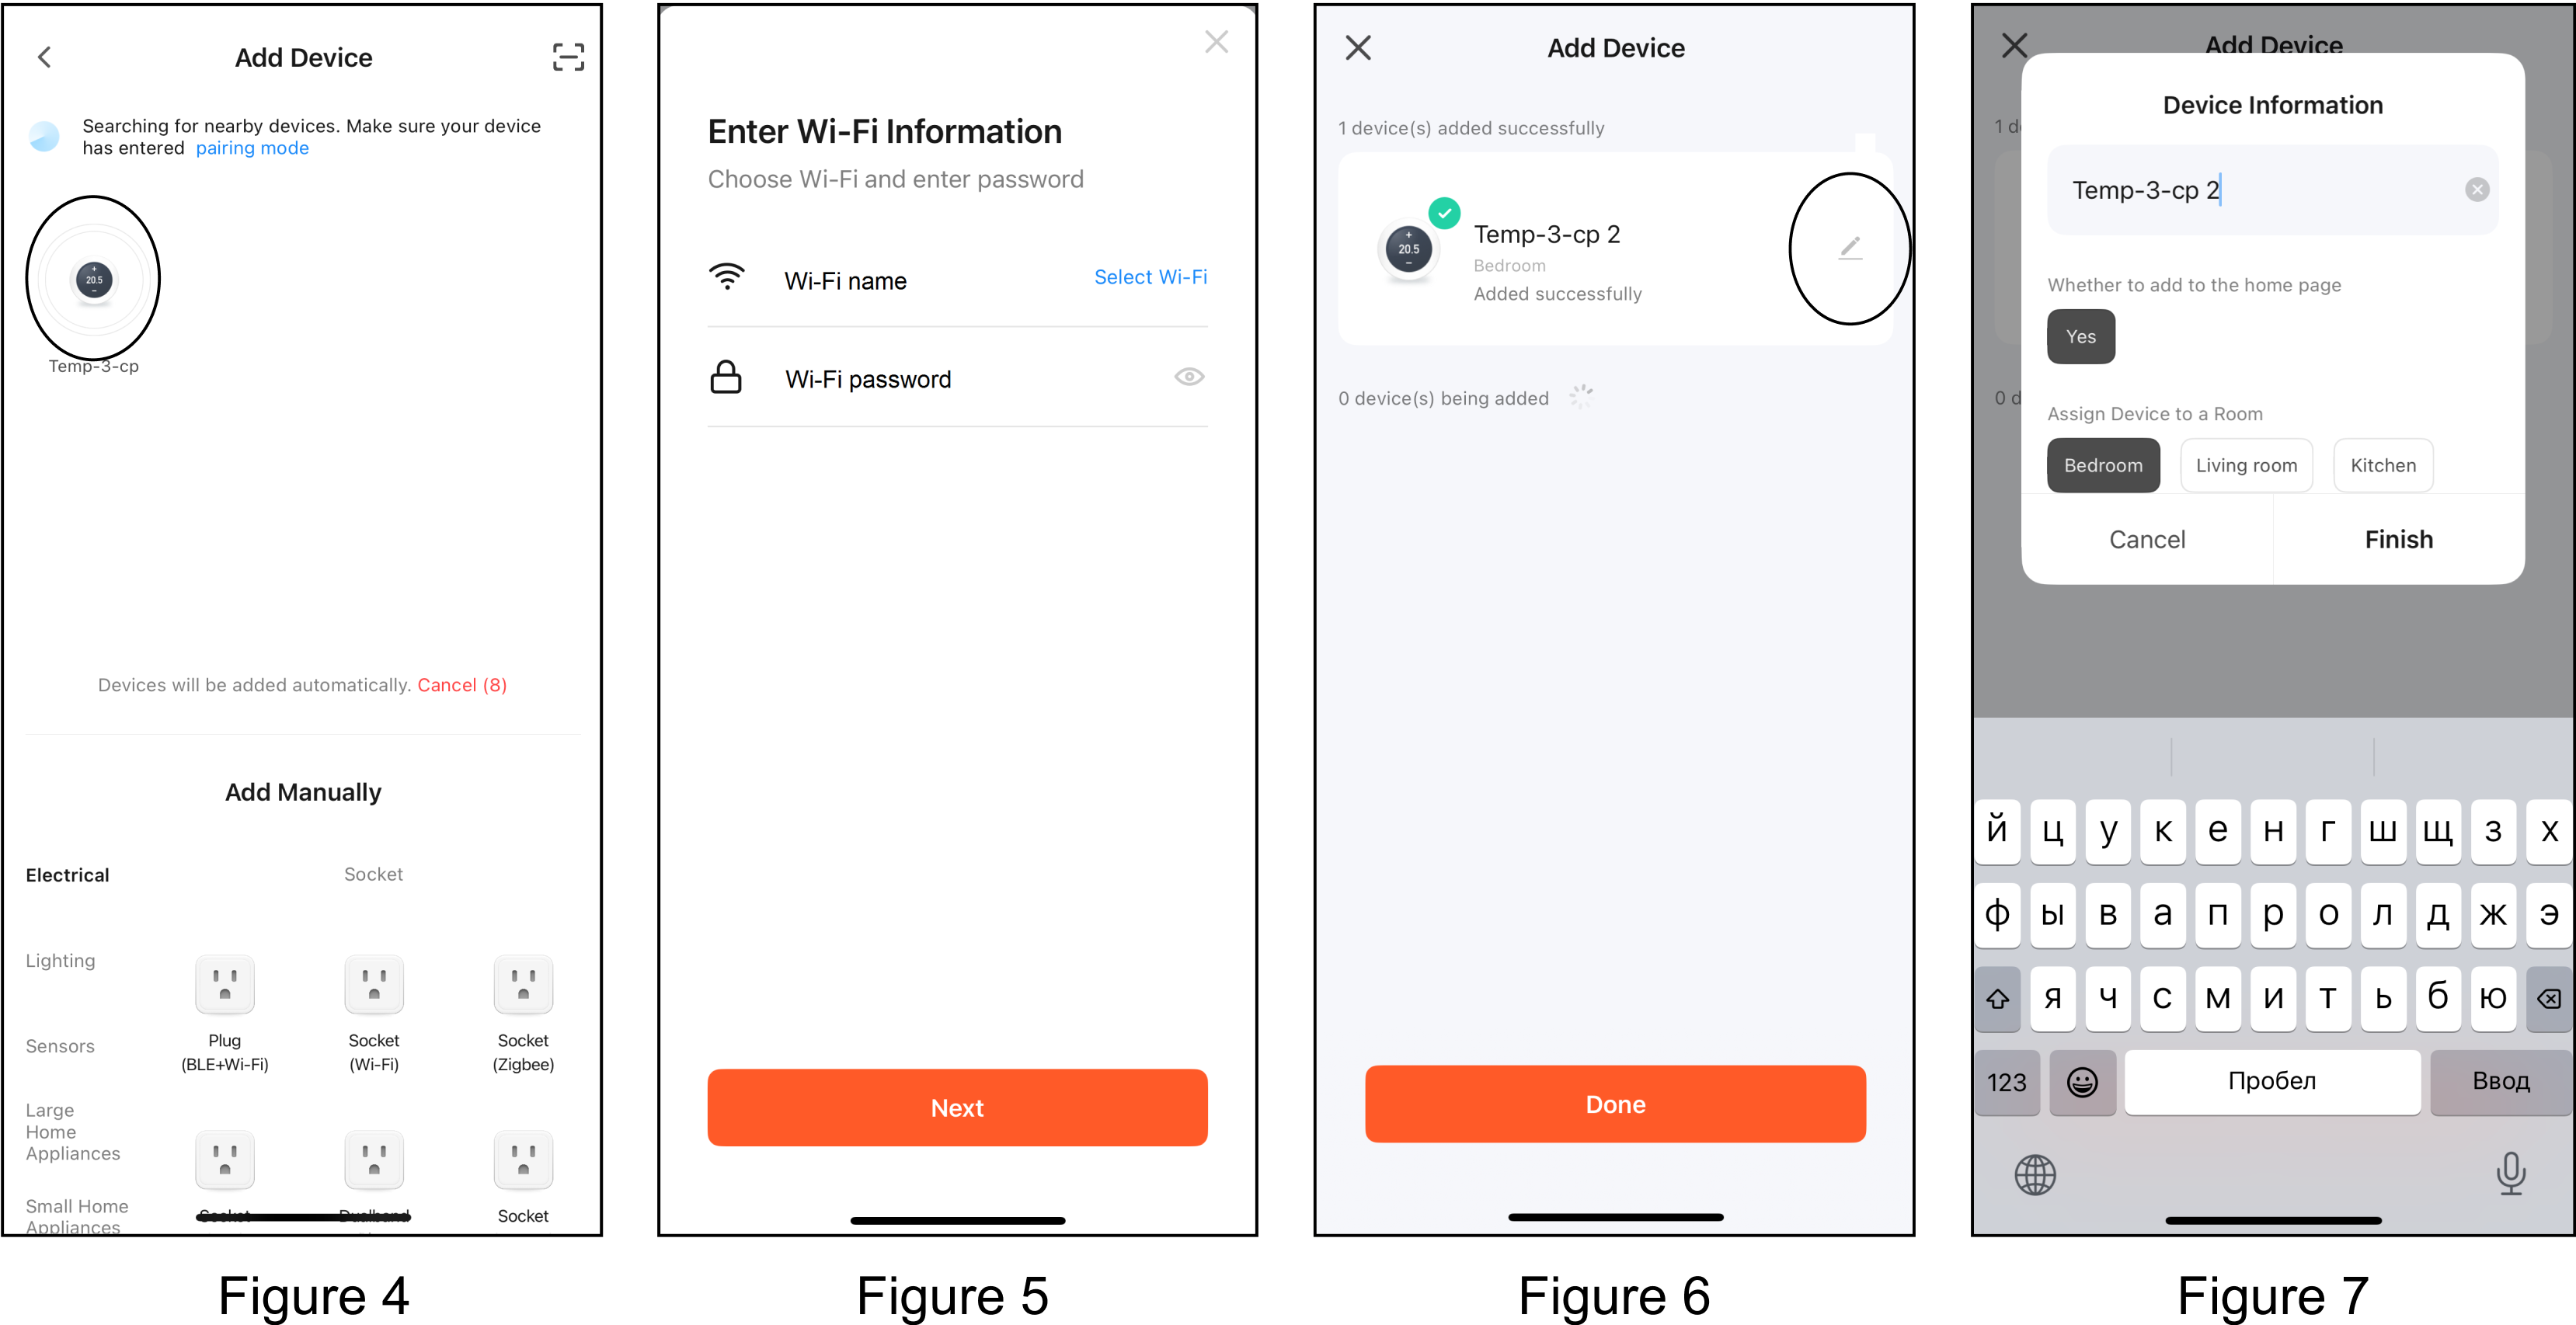
After the app connects to the device and displays it on the screen (Figure 4), go to the device pairing menu by tapping on it and choose the Wi-Fi network (Figure 5). Add the device to your account by tapping "Done" (Figure 6). If desired, change the name, location, or add a widget to the home screen by tapping the edit icon (Figure 7).
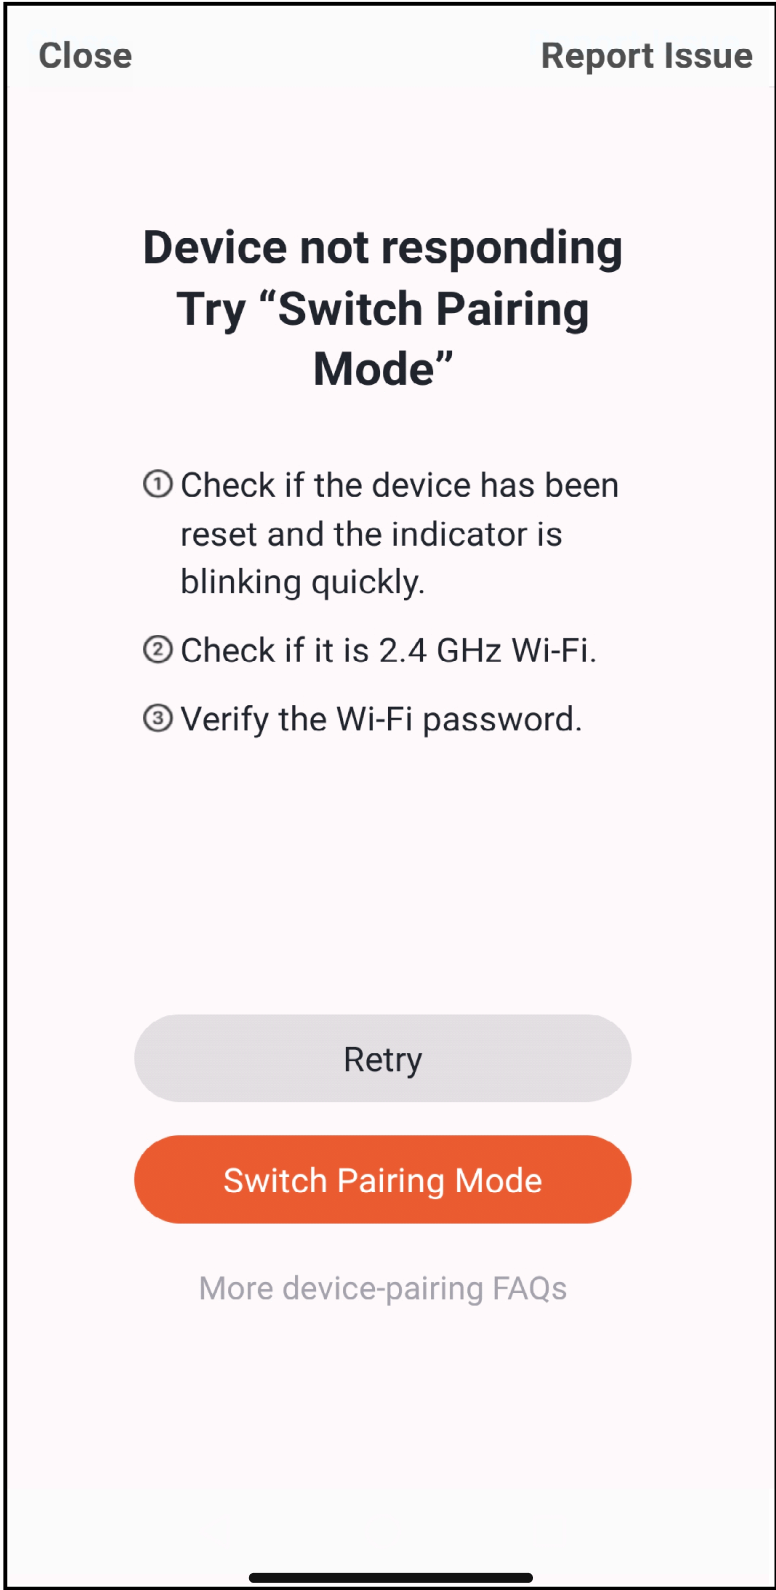
If the Wi-Fi connection fails, the app will display a page where you can Retry or view the FAQs. Before retrying the connection, first make sure that your thermostat is in pairing mode.
Exploitation
Exploitation
1. Power On/Off: Press .
2. Press to switch between modes.
3. Locking: simultaneously press and hold and for 5 sec to add or cancel the child lock.
4. Connecting to Wi-Fi: When the thermostat is powered on, press and hold for 5 sec — the Wi-Fi icon on the thermostat display will start flashing, indicating that the device is connected to the network.
Thermostat settings menu
Menu button "≡"
To enter the settings mode on a powered-off device, press and hold and or 5 sec. To move to the next parameter, press , then use and to adjust it. Press to exit the settings mode.